


How do you set up the Wacom Intuos drawing tablet?
Your Intuos (Pro) has just been delivered and you want to try it out as soon as possible. But before you can do that, you have to get the drawing tablet ready for use. But how do you set up your Intuos (Pro) exactly? We'll explain this below in 3 steps.
Install Wacom Intuos (Pro) in 3 steps

To install the Intuos Pro, you need a computer or laptop and the Wacom website. With the following 3 steps, you can install your drawing tablet in no time.
- Step 1: download the drivers
- Step 2: create an account
- Step 3: set up your drawing tablet
- Step 4: customize your drawing tablet
Step 1: download the drivers
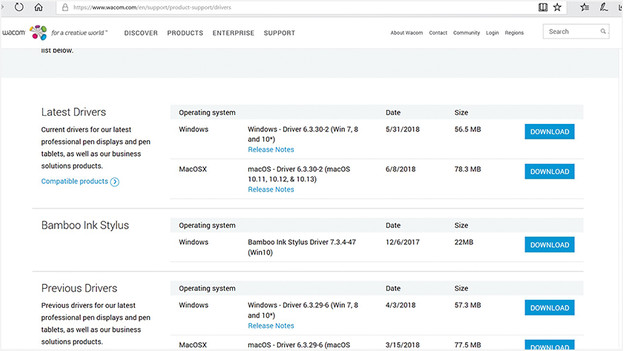
- Connect the drawing tablet to your computer or laptop with the included USB cable.
- Download and install the Wacom driver on your computer via the Wacom website. Choose the version that suits the operating system you use (Windows or Mac).
- Now, you can use the Wacom Intuos (Pro) drawing tablet as an input device for your Windows or Mac operating system. With the (Pro) Pen, you can create designs and navigate on your computer.
Step 2: create an account
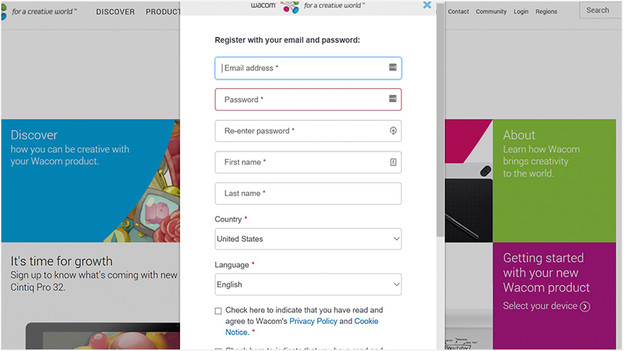
- Do you already have an account? Log in with your existing login information.
- If you don't have an account yet, click on 'Click here' next to 'Don't have an account yet?'. Click on the 'Next' button.
- Enter your personal information and create a password.
- After this, you have access to the Wacom Store right away, where you can download (free) software.
Step 3: set up your drawing tablet
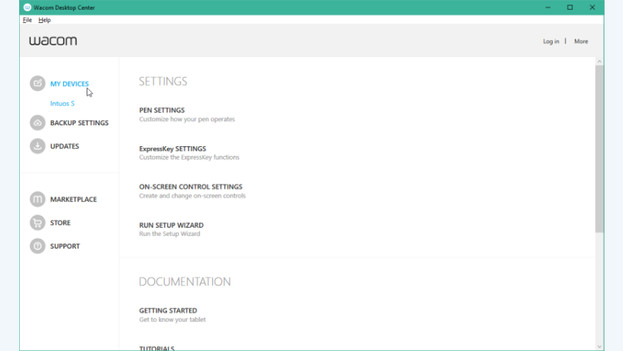
You can set creative tools such as the ExpressKeys, Touch Ring for the Pro version, and tilt sensitivity of the (Pro) Pen.
- Open the Wacom Desktop Center and select 'Getting Started'. Now you go through the 'Setup Wizard' with all the functions.
Aren't you satisfied with the settings after the setup?
- Under the 'Settings' you'll find the 'Touch Settings', 'Pen Settings', 'Pen Calibration', 'ExpressKey Settings' ,and 'Touch Ring Settings'.
Step 4: customize your drawing tablet
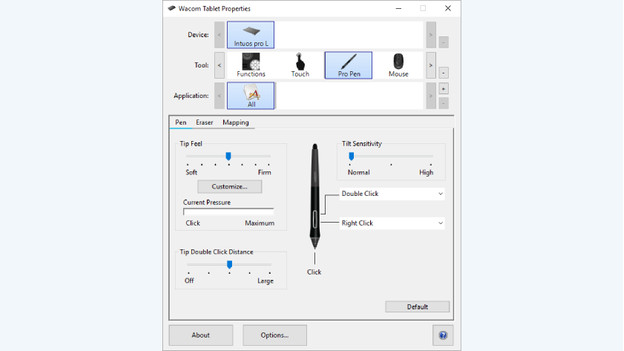
Adjust the following settings to your liking for a better workflow:
- Touch settings: set the touch functionality of the screen. You can indicate how many fingers you use and how you swipe.
- Pen settings: adjust the settings of your (Pro) Pen 2. Choose from the functions: Tip Feel, Tip Double Click, and Tilt Sensitivity to suit your needs.
- ExpressKey settings: set a desired function per button. Radial Menu or a shortcut to the Settings, for example.
- Touch Ring settings (only for Pro version): set the rotation sensitivity of the ring and set your desired functions for the ring buttons. You can do this by clicking on the 'Keystroke' button. Give the new keystroke a title, enter your desired key combination in the window, and then press 'OK'.

Article by:
Robin
Drawing Tablet Expert.
