How do you print beautiful photos with Photoshop?
Print beautiful photos
Have a look at these 4 tips, so that you use Photoshop the right way and can print your photos nicely:
- Tip 1: print photos on photo paper
- Tip 2: adjust the color space
- Tip 3: use the right resolution
- Tip 4: check the minimum number of pixels
Tip 1: print photos on photo paper

You need photo paper if you want to print your photos in high-quality. The name says it all, because this paper is especially made for printing photos. The paper has a coating, so photos are of better quality. You can choose between matte and glossy photo paper. Use matte photo paper if you don't want any greasy fingerprints or reflections on your photos. You can use glossy photo paper if you want your printed photos to be even more high-quality, because this type of paper shows more details.
Tip 2: adjust the color space

A printer uses the colors cyan, magenta, yellow, and black (CMYK). On your screen, you see images in the colors red, yellow, and blue (RGB). First check your printer to see if you have to select RGB or CMYK for your photos, otherwise you get the wrong colors when you print them. You can change the color profile by following these steps:
- Open the image in Adobe Photoshop.
- Go to Window and then Info.
- In Info, you can check if if the image has the RGB or CMYK color space. Does the photo have the wrong color space? Follow the steps below and change it to CMYK, for example.
- Go to Edit and then Color settings.
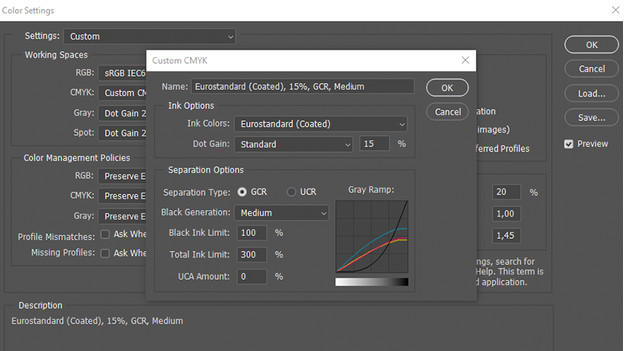
- This brings up the window for the color settings. Open the dropdown menu Work spaces and choose the option Custom CMYK.
- For the following settings, you use the same settings as shown on the screenshot.
- Next, you click OK.
- Go to Image and then Mode. You'll see that RGB is selected. Change it to CMYK. The colors of the photo will now be adjusted according to the settings from step 6.
Tip 3: use the right resolution

A printed photo looks sharp if the amount of dots/pixels per inch is at least 300. With the following steps, you can check how many dots per inch your photo contains:
- Open Photoshop.
- Go to Image and then to Image size.
Here, you can see how many dots per inch your photo contains. If it's less than 300 dots per inch, you should convert it. You can do so with the following steps:
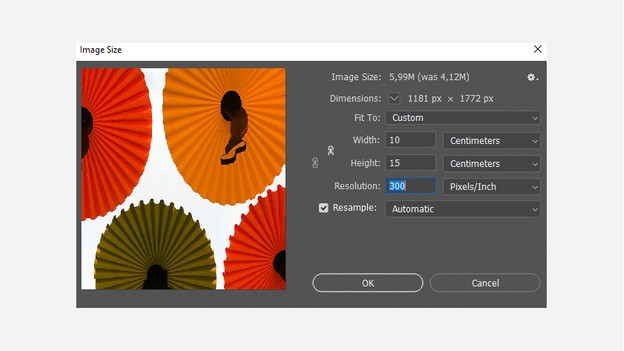
- Before you adjust the dots per inch, you have to know with what size you want to print the photo. The most common size for photos is 10x15cm (4x6 inches).
- Go to Image and then Image size.
- Insert the size you need.
- Fill in 300 for resolution and select Automatic for Resample.
- Click OK and wait for Photoshop to adjust the settings.
Note: It's possible that the image looks a bit blurry on the screen, but that's because the file is edited. Zoom in or out to see the right result.
Tip 4: check the minimum number of pixels

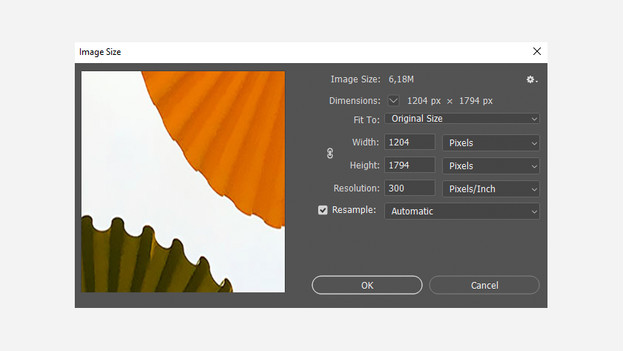
The number of pixels is important when you print photos. The number of pixels indicates how many pixels long and wide the photo is. With a size of 10x15cm, the number of pixels should be at least 1204x1794. Are the numbers lower than this? Then the photo doesn't turn out as nicely on paper. You can adjust the number of pixels as follows:
- Open Photoshop.
- Go to Image and then to Image size. Here, you can see how many pixels the image contains. Is this enough? Then you can print the photo. Follow the steps below if the photo doesn't contain the required number of pixels.
- Insert number of pixels for the length and width.
- Click on OK.
Keep in mind that adjusting the number of pixels doesn't always have a positive effect on the quality of the photo. It also helps when you save your file as large as possible. You can do this by saving the file in JPEG.


