How do you set up a VPN on a Chromebook?
VPN extensions

The easiest way to connect via a VPN is by using Chrome browser extensions. Many VPN services offer such an extension. Think of NordVPN, TunnelBear, or GlobalProtect. You can install the VPN apps via the Chrome Web Store. The downside is that these extensions only let the traffic of the Chrome browser run via the private network. If you use Android apps that need a VPN connection, this method isn't suitable.
Android applications

If a browser extension isn't sufficient and you also want to run the internet traffic of other applications via the VPN, you can download an Android application. You can download Android apps via the Google Play Store. The same thing applies for these apps as the VPN extensions. Your VPN service needs to have an application to make use of this. The advantage of an Android application over a Chrome extension is that an Android app lets all your data traffic run via your VPN. With a Chrome extension, only the traffic of the Chrome browser goes via the VPN.
Manual setup
If there is no Chrome extension or Android application of your VPN available, you need to set up the VPN manually. In the following steps, we'll explain how to do this. We'll talk about these steps:
- Step 1: go to settings
- Step 2: add VPN
- Step 3: enter information
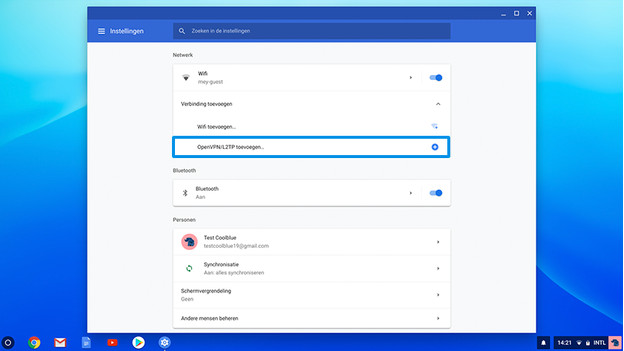
Step 2: add VPN

In the new window that appears, on Add VPN connection under Network. Then, choose Add OpenVPN/L2TP.
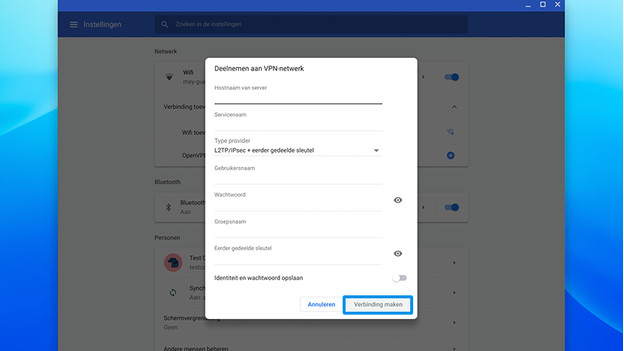
Step 3: information

A new window will appear where where you need to enter the information of your VPN. If you don't have this information, ask your system administrator of the IT department of your school or office for it. After entering the information, click Connect. If the connection was a success, you'll get a notification saying Success.
Error

Do you get an error message? In that case, check the information and try again. If you still can't connect, contact the system administrator of the VPN or IT department of your school or work.


